
>>

Thick, fudgy cookies studded with chopped milk chocolate, candy-coated chocolates and peanut butter cups for a joyful, nostalgic treat.
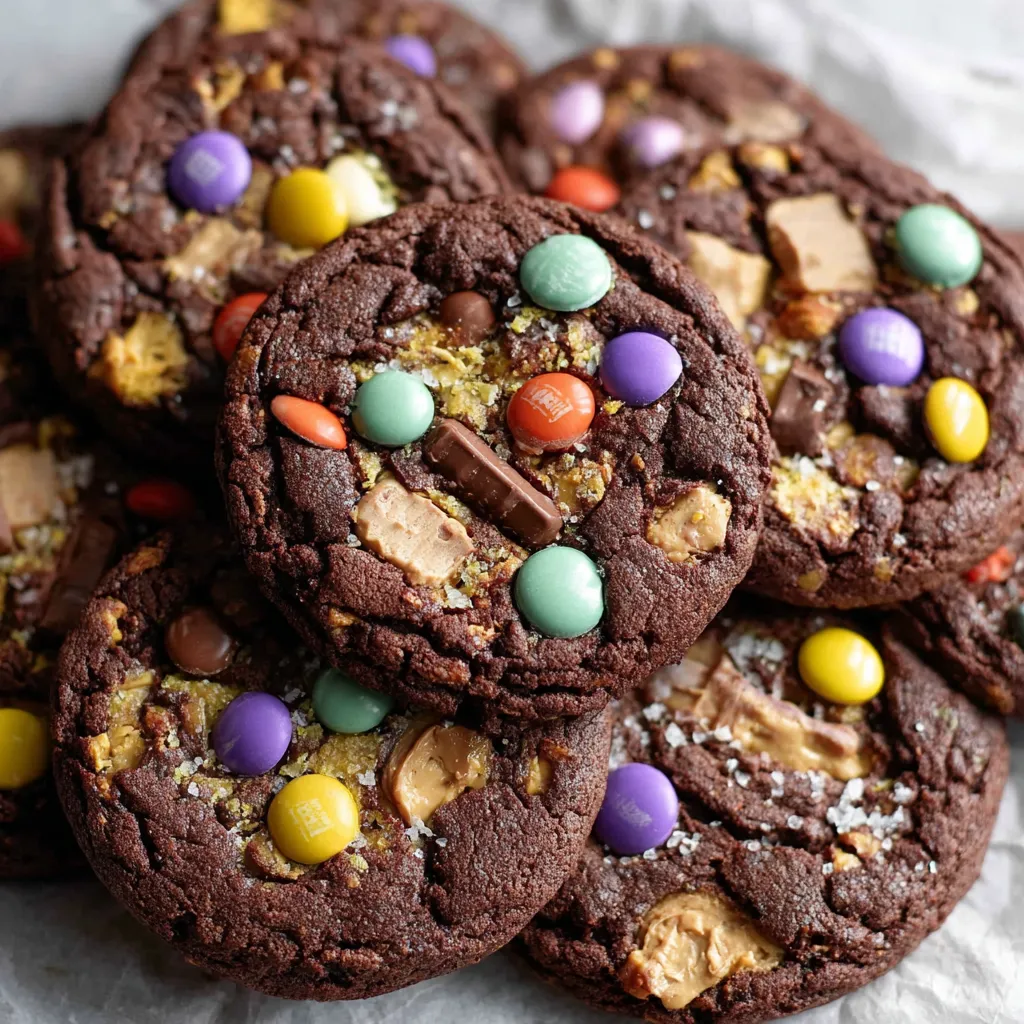
These Chocolate Monster Cookies are my go-to when I want something indulgent that still feels like a hug. I first made them on a rainy Saturday when a jar of peanut butter, a lonely bag of candy-coated chocolates and a few pantry staples were calling out to be turned into something special. The result was a cookie with a tender, fudgy center, slightly crisp edges and pockets of melted chocolate that make every bite feel celebratory. They are the kind of cookie that fills the kitchen with chocolate aroma for hours and somehow manages to disappear faster than I can plate them.
I love that these combine the deep, roasted flavor of Dutch-process cocoa with creamy peanut butter and both chopped milk chocolate and bright candy pieces. They are perfect for weekends, bake sales and last-minute party trays. The texture is substantial; not cakey, not flat, but thick and chewy with a slightly glossy top. I discovered that resting the dough briefly before baking smooths the surface and helps the cookies rise evenly, which turned a decent cookie into a memorable one. Expect lots of smiles from family and friends.
I learned early on that these cookies are a guaranteed crowd pleaser. The first time I brought a tray to a neighborhood potluck people kept asking for the recipe and then bringing cookies back to their tables. Baking them has become a ritual where I tinker with the mix ins depending on the season or who I am sharing them with. My kids call them monster cookies because each one is loaded and unapologetic in the best possible way.
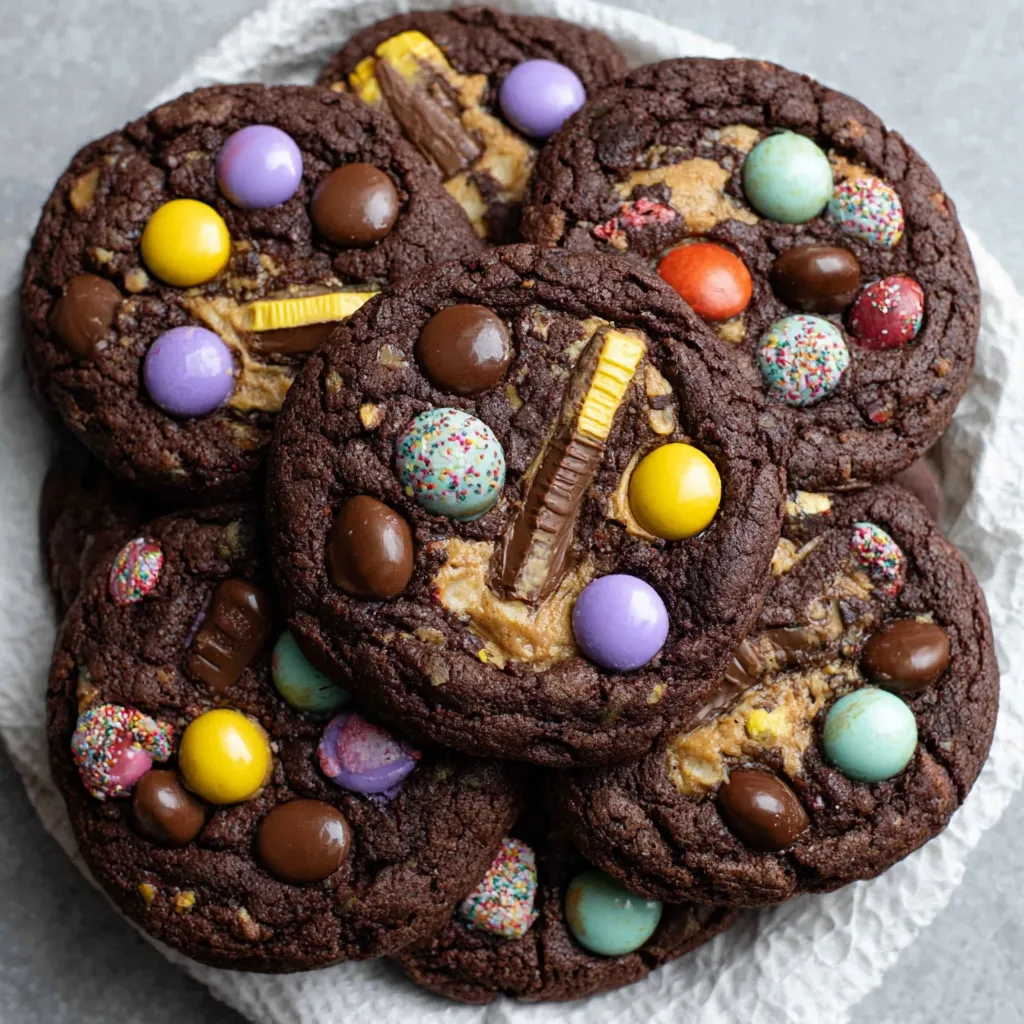
My favorite part of making these is choosing the mix ins. I have swapped in dark chocolate, white chocolate and seasonal candies to match holidays and each variation creates a new family favorite. The bright candy pieces melt into glossy pools and the quartered peanut butter cups add a gooey surprise when bitten into.
Store cooled cookies in a single layer separated by parchment if stacking to avoid sticking. At room temperature they remain soft for three days in an airtight container. For longer storage, freeze baked cookies in a single layer on a tray until solid then transfer to a freezer safe bag for up to three months. When reheating from frozen, warm in a 300 degrees Fahrenheit oven for five to seven minutes to revive the gooey center without overbrowning. For dough storage, refrigerate up to 48 hours or freeze portioned scoops for up to one month.

If you need a dairy free version replace milk chocolate and butter with dairy free alternatives and use a dairy free peanut butter cup for topping. Swap oat flour for a 1 to 1 gluten free flour blend if certified gluten free oats are not available. For a nut free version omit peanut butter and use sunflower seed butter; expect a slightly different flavor and a touch less richness. If you prefer a darker cookie, replace half the milk chocolate with chopped dark chocolate and the flavor will become more sophisticated and less sweet.
Serve warm with a glass of cold milk or a scoop of vanilla ice cream for an extra indulgent treat. For parties arrange on a platter with small bowls of extra candy-coated chocolates for guests to decorate their cookies. These are also excellent packaged in clear bags tied with ribbon as edible gifts during the holidays. For a brunch twist, offer them alongside coffee for a sweet contrast to savory items.
Loaded cookies like these draw inspiration from classic chocolate chip cookies and American candy culture where mix ins became a playful way to use confections and leftovers. The term monster cookie often refers to large, loaded cookies that combine oats, chocolate and peanut butter. This version leans into that tradition by using oat flour for a modern, tender texture and mixing in familiar candies to create a nostalgic, celebratory dessert that evokes school bake sales and community gatherings.
Adjust mix ins seasonally to make these year round. In autumn fold in chopped toasted pecans and swap candy colors for orange and brown. For winter use peppermint pieces and dark chocolate, then top with mini peppermint candies. Spring and summer welcome pastel candies or chopped berries combined with white chocolate. Small tweaks to the toppings allow these to feel festive for any holiday without changing the core dough.
Portion the dough into 1.5 tablespoon balls and freeze them on a tray until solid then transfer to a bag so you can bake fresh cookies straight from frozen. Increase baking time by a couple minutes if baking from frozen. This method is great for planning snacks for the week and for ensuring you have fresh cookies ready for unexpected guests. Label bags with date and bake as needed for best freshness.
These cookies are joyful to make and even more joyful to share. They are forgiving, flexible and always elicit smiles whether you bake a small batch for the family or a large tray for a gathering. Give them your personal touch with different chocolates and candies and make the recipe your own.
Let the dough rest 30 minutes at room temperature to hydrate the oat flour and reduce spread for a thicker cookie.
Measure oat flour by spooning into the cup and leveling; do not pack to avoid a dry, dense result.
If the butter is too hot when adding the egg, let the bowl cool briefly to prevent scrambling the egg.
Freeze portioned dough on a tray first if you plan to bake straight from frozen to maintain shape and even baking.
This nourishing chocolate monster cookies recipe is sure to be a staple in your kitchen. Enjoy every moist, high protein slice — it is perfect for breakfast or as a wholesome snack any time.
This Chocolate Monster Cookies recipe makes perfectly juicy, tender, and flavorful steak every time! Serve with potatoes and a side salad for an unforgettable dinner in under 30 minutes.
Melt the butter gently and whisk with the granulated sugar for at least one minute. Add peanut butter, salt and vanilla and whisk until smooth. Ensure the butter is warm not hot to protect the egg when added later.
Whisk in one large egg until the mixture becomes cohesive. This will help bind the dough and add a bit of lift during baking.
In a separate bowl whisk together Dutch-process cocoa, oat flour, baking soda and baking powder to remove lumps and ensure even distribution before adding to the wet mix.
Fold the dry mixture into the wet until combined. Stir in chopped milk chocolate and candy-coated chocolates until distributed. Avoid overmixing to keep the texture tender.
Cover the bowl with a tea towel and rest the dough at room temperature for 30 minutes. This hydrates the oat flour and helps produce thicker, chewier cookies.
Preheat the oven to 350 degrees Fahrenheit and line two baking sheets with parchment paper. Grease the pans lightly if preferred.
Scoop 1.5 to 2 tablespoon portions onto the prepared sheets, press quartered peanut butter cups and extra candies on top, and bake 10 to 12 minutes until edges are set. Cool five minutes on sheet then transfer to a rack.
Last Step: Please leave a rating and comment letting us know how you liked this recipe! This helps our business to thrive and continue providing free, high-quality recipes for you.
Leave a comment & rating below or tag
@feastu on social media!

Delightfully spooky and sweet, these bite-sized mummy cake balls combine moist cake, creamy centers, and a vanilla candy shell for effortless Halloween fun.

Fluffy homemade donuts crowned with a shimmering galaxy glaze. Fry or bake, swirl bold colors, and watch these showstoppers disappear fast.

Buttery shortbread crust meets gooey pecan pie filling in easy bar form, perfect for holidays, bake sales, and cozy weeknights.
Leave a comment & rating below or tag @feastu on social media!
Enjoyed this recipe? Share it with friends and family, and don't forget to leave a review!
This recipe looks amazing! Can't wait to try it.
Comments are stored locally in your browser. Server comments are displayed alongside your local comments.

Join to receive our email series which contains a round-up of some of our quick and easy family favorite recipes.
