
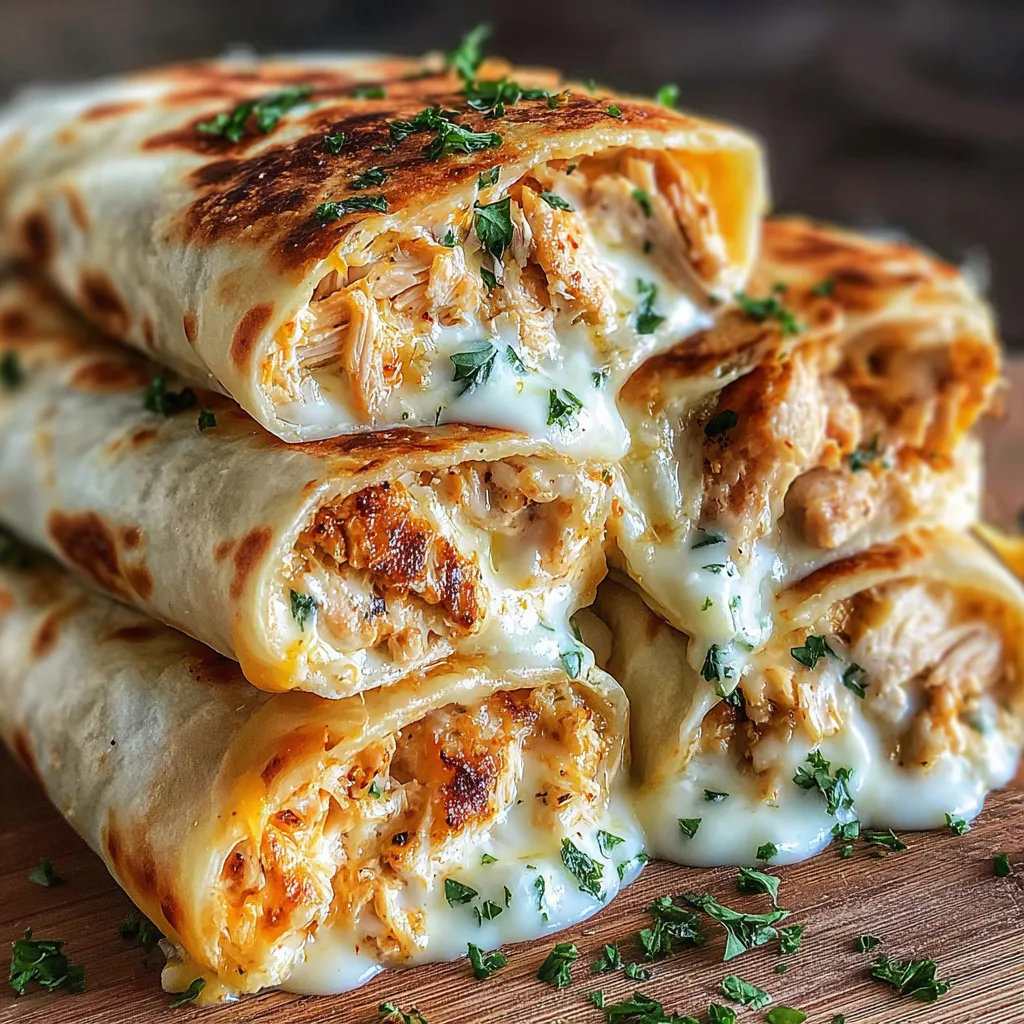
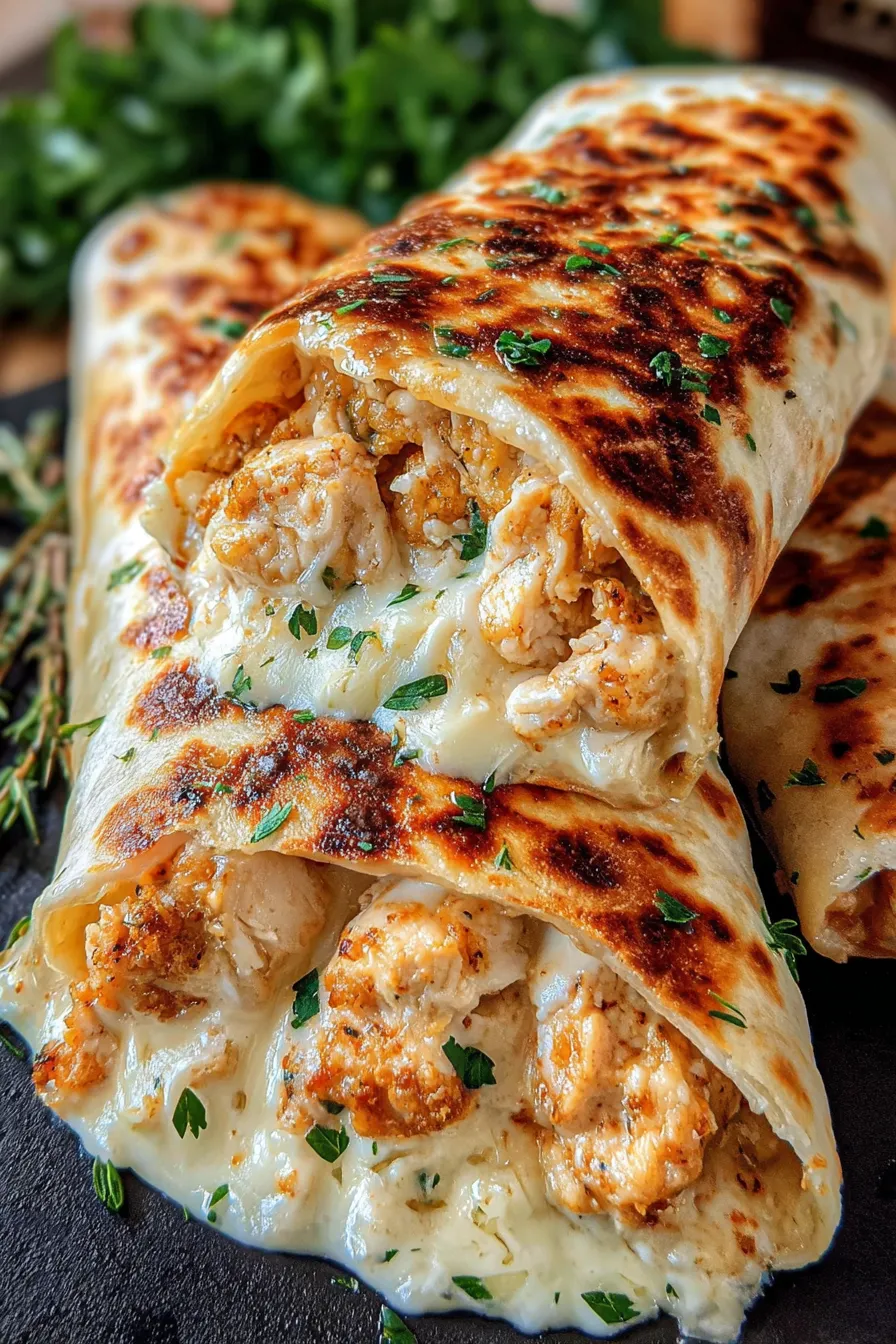
Ooey-Gooey Cheesy Garlic Chicken Wraps

Tender shredded chicken, roasted garlic, and melting cheddar tucked into warm flour tortillas and baked until irresistibly gooey.
This ooey-gooey cheesy garlic chicken wrap became a weeknight hero in my kitchen the moment I tested the first roll. I was chasing comfort that was portable and packed with flavor — something my kids could hold and my partner could enjoy between late meetings. The combination of golden seared chicken, fragrant sautéed garlic, and generous shredded cheddar transforms a simple tortilla into a satisfying, hand-held dinner that tastes like a warm hug. I discovered this mix on a hectic Tuesday when the pantry was sparse but everyone wanted something cozy; it turned out even better than I imagined and immediately earned a permanent spot in our rotation.
What makes these wraps so special is the balance of textures and aroma: the crisped edges of the tortillas from baking, the soft, shreddable chicken, and the molten-cheesy pull when you bite in. The garlic is lightly cooked so it remains aromatic without overpowering, while a sprinkle of Italian seasoning adds a faint herbaceous lift. These are perfect for busy families, casual get-togethers, or a simple solo dinner. They travel well for road trips and make great party finger food when halved. Over time I’ve swapped cheeses and added small tweaks to suit seasons, but the core combination remains the same — simple, fast, and eternally comforting.
Why You'll Love This Recipe
- Ready quickly: from prep to oven in roughly 35 minutes, perfect for busy weeknights or last-minute guests.
- Pantry-friendly ingredients: uses flour tortillas, shredded cheddar, and basic spices so you can usually make it without a special grocery run.
- Crowd-pleaser: gooey cheese and garlicky chicken appeal to kids and adults alike, making it ideal for family dinners or party platters.
- Make-ahead friendly: you can cook and shred the chicken earlier in the day, then assemble and bake when needed to save time.
- Customizable: swap the cheddar for pepper jack or mozzarella for a different flavor profile, or add vegetables for extra color and nutrients.
- Hand-held comfort: these are easy to eat, minimal cleanup, and transportable — great for picnics, potlucks, and lunchboxes.
On my first attempt I served these to a skeptical teenager who proclaimed, 'These are better than takeout.' That line alone convinced me to keep perfecting the technique. Since then, every family gathering brings requests for seconds; I once brought a batch to a potluck and watched them disappear within minutes. The simplicity is deceptive — small adjustments in seasoning and cooking time can elevate the result from good to unforgettable, which is why I include a few tips below that I learned the hard way.
Ingredients
- Boneless, skinless chicken breasts (approximately 1.5 pounds, about 3 medium breasts): Choose even-sized pieces for uniform cooking. Organic or free-range chicken will give a cleaner flavor, but any fresh breasts work. If using frozen, thaw completely and pat dry to avoid steaming in the pan.
- Fresh garlic (4 cloves, minced): Fresh garlic gives a brighter, sharper aroma than jarred. Mince finely so it distributes evenly; if you prefer milder garlic, use 2–3 cloves or lightly roast it first.
- Shredded cheddar cheese (2 cups, about 8 ounces): Sharp cheddar melts beautifully and provides a tangy contrast to the chicken. Pre-shredded cheese contains anti-caking agents that slightly affect melt, so shred a block if possible for the best ooze.
- Large flour tortillas (4, 10-inch): Use high-quality, pliable tortillas for easy rolling. Warm briefly before assembling if they feel stiff — it makes rolling without tearing much easier.
- Olive oil (2 tablespoons): For searing the chicken and sautéing garlic. Use extra virgin for flavor, but regular olive oil will handle the heat slightly better.
- Italian seasoning (1 teaspoon): A simple herb blend of oregano, basil, and thyme adds depth. If you have fresh herbs, a tablespoon of chopped parsley or basil brightens the filling.
- Salt and freshly ground black pepper to taste: Season in layers — on the raw chicken, then again as you finish the shredded meat — to build depth.
Instructions
Preheat and prepare the baking dish:Set your oven to 400°F (200°C) and lightly grease a 9x13-inch baking dish with nonstick spray or a thin brush of oil. Preheating ensures the tortillas begin to crisp as soon as they hit the oven, and the hot environment helps the cheese melt evenly. Position a rack in the middle of the oven for balanced browning.Season and sear the chicken:Pat the chicken dry with paper towels and season both sides generously with salt and pepper. Heat 2 tablespoons of olive oil in a large skillet over medium heat until shimmering. Add the breasts and sear for 5–7 minutes per side, depending on thickness, until the exterior is golden and an instant-read thermometer reads 165°F (74°C) at the thickest point. Avoid overcrowding — cook in batches if needed. Proper browning adds flavor via the Maillard reaction.Rest and shred the chicken:Transfer the cooked breasts to a cutting board and let rest for 5 minutes to allow juices to redistribute. Resting prevents dry shredded meat. Use two forks or your fingers to pull the chicken into bite-sized shreds. Shredding while still slightly warm makes the mixture more cohesive when combined with melted cheese.Sauté the garlic and finish the filling:In the same skillet, reduce heat to medium-low and add the minced garlic. Sauté for about 30–60 seconds until fragrant — watch carefully to avoid burning, which causes bitterness. Return the shredded chicken to the skillet, toss with 1 teaspoon of Italian seasoning, and season with a pinch more salt and pepper. Stir for about 1 minute to marry flavors and absorb any garlic-infused oil.Assemble the wraps:Lay a tortilla flat, spoon a generous portion of the shredded chicken down the center, and top with about 1/2 cup of shredded cheddar (adjust to taste). Fold the sides in and roll tightly, tucking the seam underneath to keep them closed. Repeat for the remaining tortillas and place each wrap seam-side down in the prepared baking dish so they stay sealed while baking.Bake until golden and melty:Bake in the preheated oven for 10–15 minutes until heated through, the cheese is fully melted, and the tortillas begin to turn golden at the edges. For extra crunch, finish under the broiler for 30–60 seconds — watch closely to prevent burning. Remove from the oven and let rest 2 minutes before serving to avoid scalding molten cheese.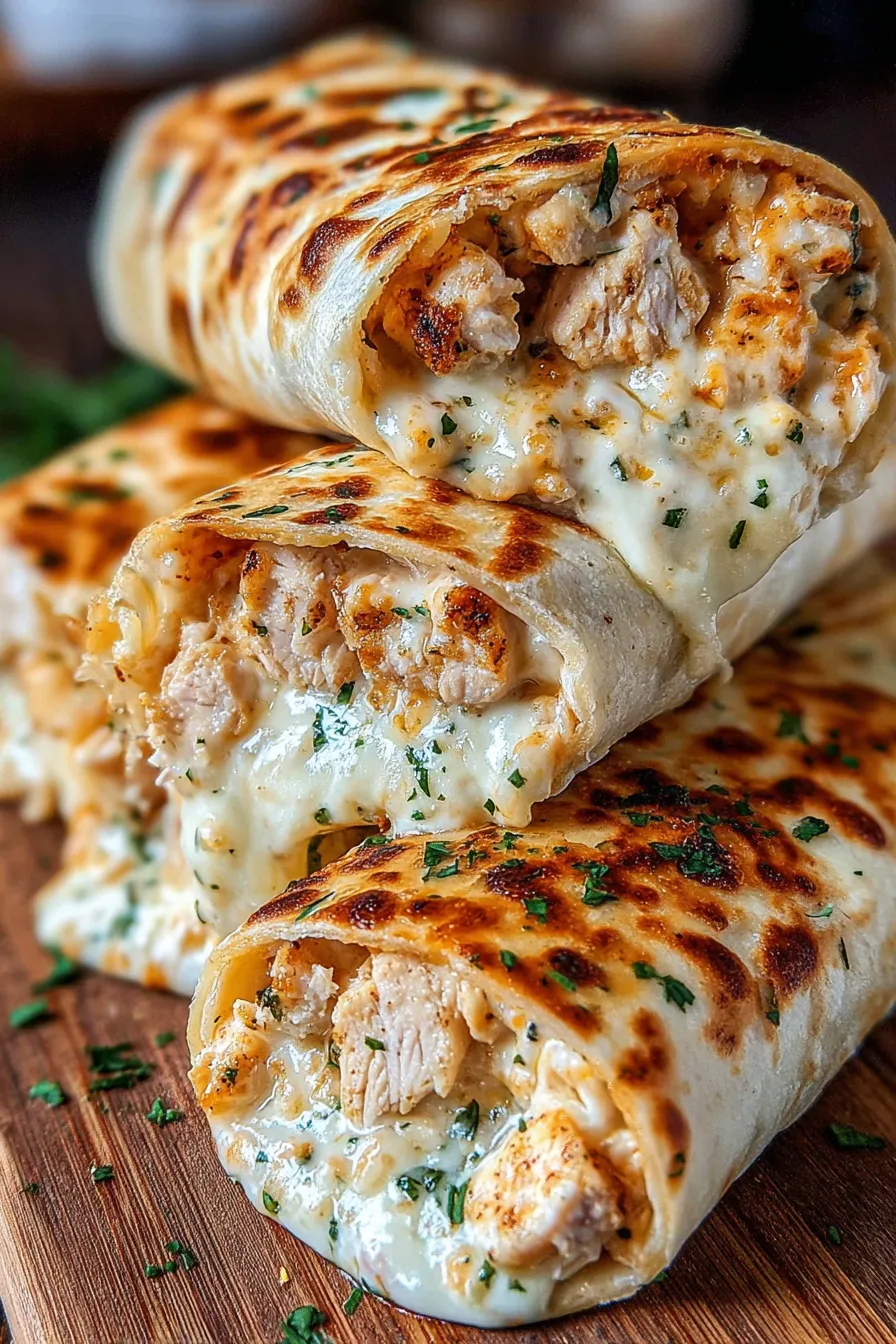
You Must Know
- Storage: these hold well refrigerated for up to 3 days when tightly wrapped in foil or stored in an airtight container.
- Reheating: reheat in a 350°F (175°C) oven for 8–10 minutes or in a toaster oven to preserve crisp edges; microwave softens the tortilla quickly.
- Freezing: wrap individually in foil and freeze for up to 3 months. Bake from frozen at 400°F (200°C) for 18–22 minutes until heated through.
- Nutritional note: rich in protein from the chicken and cheese — balance with a side salad or steamed vegetables for a complete meal.
My favorite aspect of these wraps is how forgiving they are. I once doubled the garlic by mistake and ended up loving the extra punch; another time I swapped cheddar for a mix of mozzarella and pepper jack for a creamier, slightly spicy bite. Family members have packed them for lunch, brought them to tailgates, and enjoyed them as late-night snacks. The consistent feedback is always about the cheese pull — it elicits audible 'oohs' and 'aahs' and keeps everyone coming back.
Storage Tips
Store cooled wraps in an airtight container or wrapped tightly in foil to prevent drying. In the fridge they keep well for up to 3 days; label with the date to track freshness. For longer storage, individually wrap each wrap in foil and place in a freezer-safe bag for up to 3 months. When reheating from frozen, bake at 400°F (200°C) for about 18–22 minutes, turning once if possible, until internal temperature reaches 165°F (74°C). Avoid microwaving from frozen to maintain a pleasant tortilla texture; the oven restores the crisp edges and melts the cheese evenly.
Ingredient Substitutions
To adapt for taste or dietary needs, swap flour tortillas for gluten-free wraps or large corn tortillas (note corn will be less flexible and may tear). Replace cheddar with Monterey Jack or a 50/50 blend of mozzarella and pepper jack for creamier melt and a milder flavor. For lower fat, use reduced-fat cheese and swap one chicken breast for 1 cup of cooked beans to stretch the filling. If you want more herbaceous notes, add a tablespoon of chopped fresh parsley, cilantro, or basil when tossing the shredded chicken.
Serving Suggestions
Serve these with a crisp green salad dressed in a light vinaigrette to cut the richness, or offer a bowl of pico de gallo, sliced avocado, or sour cream for toppings. For parties, cut each wrap on the diagonal and secure with a toothpick to make 8 appetizers from 4 wraps. They pair well with roasted sweet potato wedges, a simple slaw, or cups of tomato basil soup for a comforting combo. Garnish with chopped fresh parsley and a wedge of lemon for brightness.
Cultural Background
While handheld wraps are common across many cuisines, this particular cheesy garlic chicken combination draws from American comfort food traditions — melding grilled or seared proteins with melted cheese inside a soft tortilla. It shares lineage with items like quesadillas and baked burritos but is designed for quick weeknight cooking rather than slow braises or deep frying. The use of Italian seasoning nods to Mediterranean herb blends, adding an aromatic layer that balances the richness of the cheese.
Seasonal Adaptations
In summer, add grilled corn and chopped tomatoes to the filling for freshness, and swap cheddar for a lighter queso fresco. In winter, stir in roasted poblano peppers and caramelized onions for depth, or add a spoonful of pesto for an herbal warmth. Holiday gatherings welcome a cranberry-chutney drizzle for something unexpected. The recipe scales well — increase chicken and cheese quantities and bake in larger casserole dishes for holiday crowds.
Meal Prep Tips
For efficient meal prep, cook and shred all the chicken at the start of the week and store it in a sealed container. Keep cheese shredded and tortillas wrapped in a damp cloth in the fridge. When ready to eat, assemble and bake fresh in 10–15 minutes. Alternatively, assemble wraps and freeze them for future meals; bake from frozen as noted. Use stackable containers and label portions to streamline grab-and-go lunches during the week.
These wraps are a small example of how simple ingredients and good technique create something greater than the sum of its parts — the kind of comfort food that becomes part of your life’s easy repertoire. Enjoy, adapt, and make them your own.
Pro Tips
Pat chicken dry and sear in a hot skillet to develop flavor through browning (Maillard reaction).
Shred the chicken while still slightly warm for easier mixing with the melted cheese.
Warm tortillas before assembling to make them more pliable and avoid tearing.
Finish under the broiler for 30–60 seconds for extra crispness, watching closely to avoid burning.
If freezing, wrap individually in foil and store in a freezer bag to prevent freezer burn.
This nourishing ooey-gooey cheesy garlic chicken wraps recipe is sure to be a staple in your kitchen. Enjoy every moist, high protein slice — it is perfect for breakfast or as a wholesome snack any time.
FAQs about Recipes
How do I prevent the tortillas from tearing when rolling?
To keep tortillas from tearing, warm them briefly in the microwave for 10 seconds wrapped in a damp paper towel or heat them in a dry skillet for 20 seconds per side before assembling.
Can I use roasted garlic instead of sautéed garlic?
Yes — roast garlic at 400°F (200°C) for 20–25 minutes until soft, then mash and add to the shredded chicken for a milder, sweeter garlic flavor.
Tags
Ooey-Gooey Cheesy Garlic Chicken Wraps
This Ooey-Gooey Cheesy Garlic Chicken Wraps recipe makes perfectly juicy, tender, and flavorful steak every time! Serve with potatoes and a side salad for an unforgettable dinner in under 30 minutes.
Ingredients
Main
Instructions
Preheat and prepare the baking dish
Preheat oven to 400°F (200°C). Lightly grease a 9x13-inch baking dish with nonstick spray or a thin coat of oil and position a rack in the middle of the oven.
Season and sear the chicken
Pat chicken dry and season with salt and pepper. Heat 2 tablespoons olive oil in a large skillet over medium heat and sear the breasts 5–7 minutes per side until a thermometer reads 165°F (74°C).
Rest and shred the chicken
Transfer chicken to a cutting board, rest 5 minutes, then shred with two forks into bite-sized pieces to retain juiciness.
Sauté garlic and combine
Sauté minced garlic in the same skillet over medium-low for 30–60 seconds until fragrant. Return shredded chicken to the pan, toss with 1 teaspoon Italian seasoning, and season to taste.
Assemble the wraps
Place a generous portion of shredded chicken and about 1/2 cup cheddar in the center of each warmed tortilla. Roll tightly, tucking the seam underneath, and place seam-side down in the baking dish.
Bake until melty
Bake for 10–15 minutes until heated through and cheese is melted. For extra crispness, broil for 30–60 seconds, watching carefully. Let rest 2 minutes before serving.
Last Step: Please leave a rating and comment letting us know how you liked this recipe! This helps our business to thrive and continue providing free, high-quality recipes for you.
Nutrition
Did You Make This?
Leave a comment & rating below or tag
@feastu on social media!
Categories:
You might also like...

Spooky Mummy Cake Balls
Delightfully spooky and sweet, these bite-sized mummy cake balls combine moist cake, creamy centers, and a vanilla candy shell for effortless Halloween fun.

Galaxy Donuts with Swirled Glaze
Fluffy homemade donuts crowned with a shimmering galaxy glaze. Fry or bake, swirl bold colors, and watch these showstoppers disappear fast.

Buttery Pecan Pie Bars
Buttery shortbread crust meets gooey pecan pie filling in easy bar form, perfect for holidays, bake sales, and cozy weeknights.
Did You Make This?
Leave a comment & rating below or tag @feastu on social media!
Rate This Recipe
Share This Recipe
Enjoyed this recipe? Share it with friends and family, and don't forget to leave a review!
Comments (1)
This recipe looks amazing! Can't wait to try it.
Comments are stored locally in your browser. Server comments are displayed alongside your local comments.

Hi, I'm Emma!
What's Popular

30-Minute Meals!
Join to receive our email series which contains a round-up of some of our quick and easy family favorite recipes.