
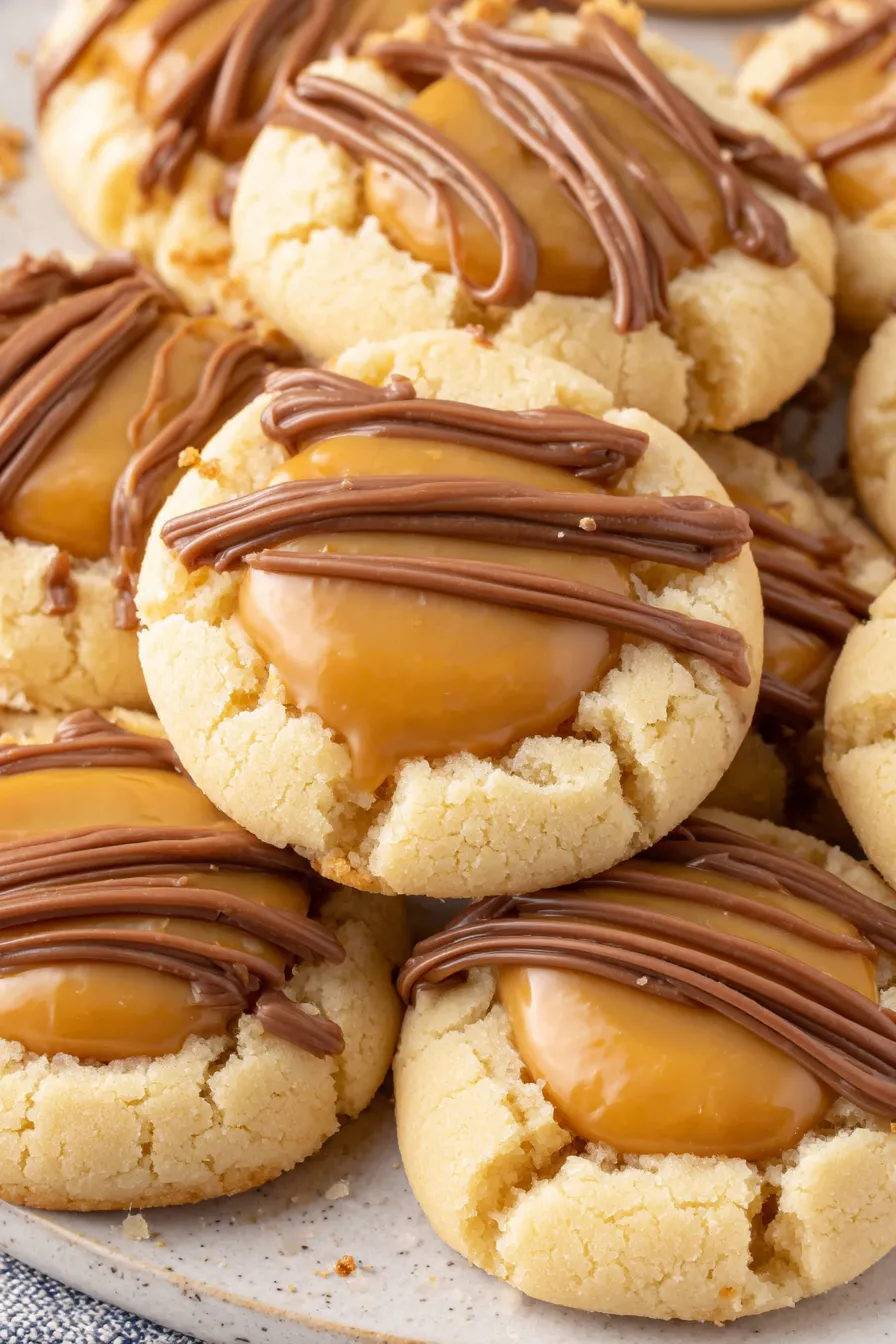
Twix Thumbprint Cookies

Buttery shortbread cookies filled with gooey caramel and drizzled with milk chocolate — a homemade Twix in cookie form.
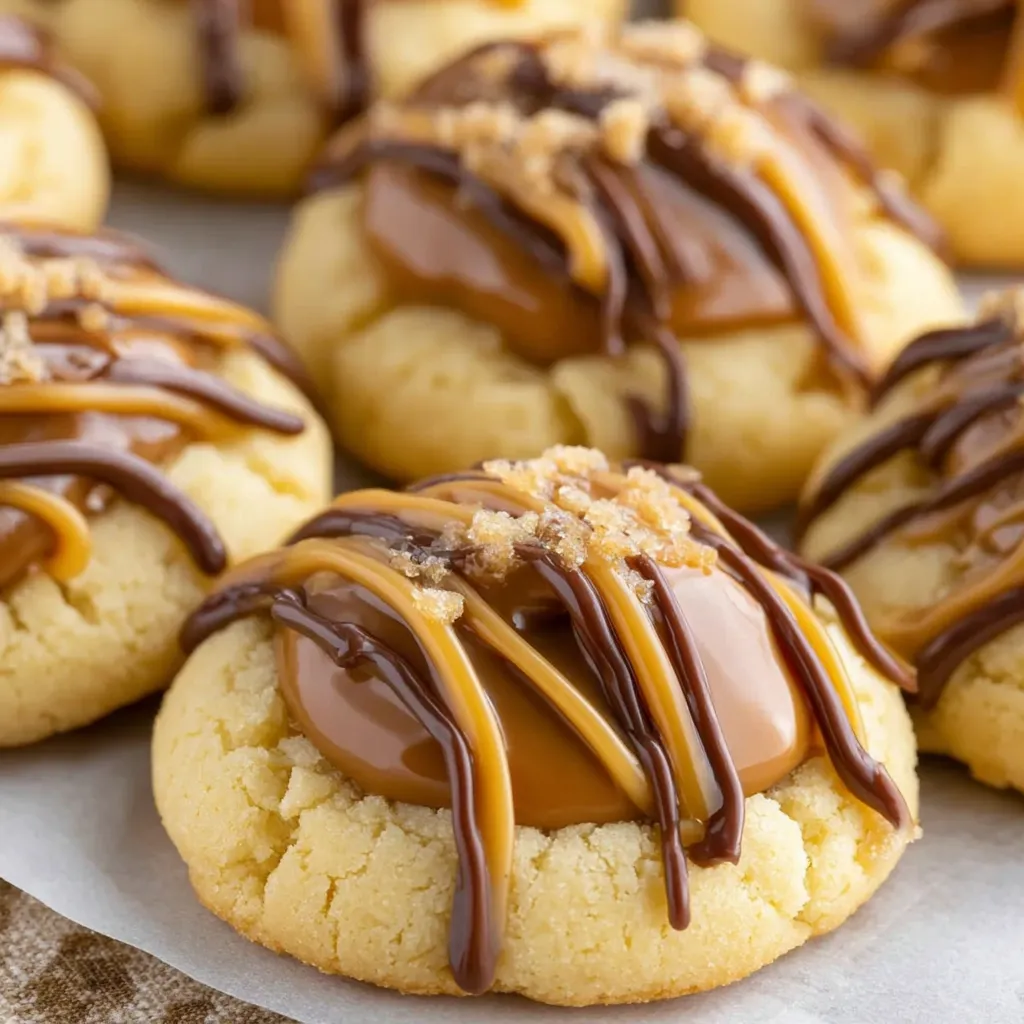
This recipe for Twix Thumbprint Cookies has been my go-to when I want the familiar, nostalgic flavor of a Twix bar but in a cozy, bite-sized cookie. I discovered this combination during a holiday baking marathon when I had a surplus of caramels and two sticks of butter left after another recipe. The result was a crisp-but-tender cookie that holds a soft pool of caramel and a glossy ribbon of milk chocolate on top. The texture is what keeps me coming back: a shortbread-like base that gives a delicate snap, a chewy center, and a creamy chocolate finish. It’s the sort of cookie that disappears fast at parties and elicits requests for the recipe from friends.
What makes these especially memorable is how accessible the technique is. You don’t need a candy thermometer or advanced piping skills—just basic mixing, freezing briefly for shape retention, and gentle heating to melt caramels and chocolate. I often make a double batch for school bake sales and wrap individual cookies in parchment for gifting. These cookies shine when fresh, but they also travel well and freeze beautifully for later indulgence.
Why You'll Love This Recipe
- Ready with about 45 minutes of active prep and a short bake, these cookies are great for last-minute parties while still delivering bakery-quality flavor.
- The dough uses pantry staples—butter, sugar, flour, eggs—so you can usually pull these together without a special shop run.
- Make-ahead friendly: shape and freeze raw dough, then bake straight from frozen for fresh cookies any time.
- Each cookie gets a measured teaspoon of caramel and a neat chocolate drizzle, making them visually appealing for gatherings and gifts.
- Adaptable: swap the milk chocolate for dark or white chocolate, or use specialty caramels for flavor variations.
I remember baking these one rainy weekend while my kids made paper chains at the kitchen table. The warm caramel made the house smell like holiday treats and everyone paused their crafting to dunk a cookie in milk. Simple moments like that are why this recipe is a staple for me.
Ingredients
- Unsalted butter (1 cup / 2 sticks): Use high-quality unsalted butter, softened to room temperature. European-style butter brings a slightly richer flavor; soften until it yields to a fingertip but is not greasy.
- Granulated sugar (3/4 cup): Provides structure and a slight crunch. Spoon the sugar into the cup and level it off for accurate measurement.
- Large egg + 1 egg yolk: Both at room temperature for even mixing. The extra yolk adds richness and tenderness to the dough.
- Pure vanilla extract (1/2 tsp): Adds depth. Use a bottled pure vanilla for consistent results.
- All-purpose flour (2 2/3 cups): Spoon and level the flour to avoid packing. This amount yields a soft, slightly crumbly cookie with good hold for the caramel.
- Kosher salt (1/4 tsp): Balances sweetness; if using fine table salt, reduce slightly.
- Soft caramel candies (24): One per cookie. Unwrap small individually wrapped caramels or use chopped caramel pieces if larger.
- Heavy whipping cream (1/2 cup): Helps loosen the caramel into a spoonable consistency. Whole cream works best for glossy, smooth filling.
- Milk chocolate (4 oz / chips or chopped bar): Melt for the drizzle. A good-quality milk chocolate bar chopped gives the silkiest finish.
Instructions
Cream the butter and sugar: In a large bowl, cream together 1 cup softened unsalted butter and 3/4 cup granulated sugar on medium speed until the mixture is light and homogenous, about 2 minutes. Scrape the bowl sides to ensure even mixing. Overbeating at this stage can incorporate too much air and make the cookie spread during baking. Add eggs and vanilla: Add the whole egg and beat until incorporated, then add the additional egg yolk and 1/2 teaspoon vanilla. Mix just until blended; you want a smooth, glossy batter without overworking the dough. Incorporate dry ingredients: Whisk together 2 2/3 cups all-purpose flour and 1/4 teaspoon kosher salt. Gradually add the dry ingredients to the wet, mixing on low until a soft, cohesive dough forms. The dough should be slightly tacky but hold its shape when rolled into a ball. Shape and thumbprint: Line a cookie sheet with parchment. Scoop one leveled tablespoon of dough per cookie and roll into a smooth ball. Place on the parchment and press the center with the back of a tablespoon to create a shallow well for the caramel. Repeat for all dough balls. For uniform cookies, chill on a plate or small sheet in the freezer for 30 minutes. Preheat and bake: Preheat oven to 350°F (180°C). Arrange cookies on a parchment-lined baking sheet spaced about 2 inches apart. Bake for 15 to 16 minutes until edges are lightly golden. If centers puff up during baking, press down gently with a measuring spoon while still warm to reestablish the well. Cool: Transfer cookies to a wire rack and cool completely before filling. Cooling allows the caramel to sit on top rather than sink into the cookie. Prepare caramel filling: In a small saucepan over low heat, combine 24 soft caramel candies and 1/2 cup heavy whipping cream. Stir constantly until melted and smooth. If caramel firms, return to low heat and stir until pourable. Spoon about 1 teaspoon of warm caramel into each cookie well. Work quickly as caramel sets within minutes. Melt chocolate and drizzle: Place 4 ounces milk chocolate in a small saucepan over low heat or use a double boiler. Stir constantly until completely melted and smooth. Let cool slightly, transfer to a small piping bag or plastic bag, snip a tiny corner, and drizzle over the caramel. Allow chocolate to set before serving.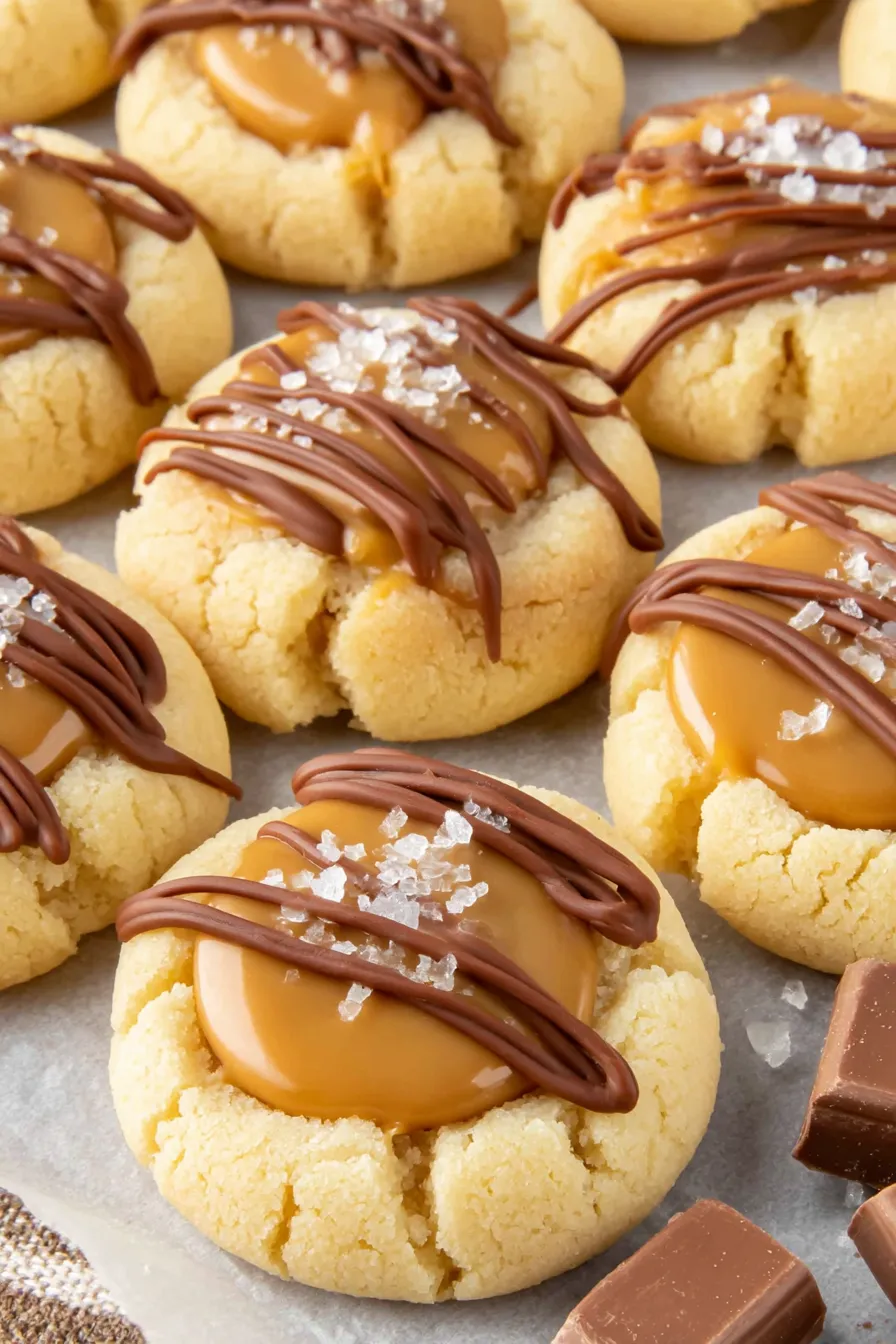
You Must Know
- These cookies freeze very well: shape and freeze the unbaked dough balls on a tray, then transfer to an airtight container for up to 3 months.
- High in energy and rich due to butter, cream, and chocolate; each cookie is approximately 225 calories depending on exact portioning.
- Store baked cookies in a single layer at room temperature for 2 days, or refrigerate up to 5 days; chocolate drizzle may bloom if exposed to temperature swings.
- When melting caramels, keep the heat low and stir continuously to prevent seizing or burning; heavy cream thins the caramel for an ideal spoonable consistency.
My favorite part about making these is how quickly the kitchen fills with the aroma of caramel and warm butter. Guests often comment they taste just like a Twix but with a homemade personality—less cookie-bar rigidity and more shortbread charm. The first time I made them, a neighbor popped over and left with six cookies, promising to bring them back empty-handed; they kept their word.
Storage Tips
To store, place baked cookies in a single layer separated by parchment to prevent sticking, and keep them in an airtight container at room temperature for up to 48 hours. For longer storage, refrigerate up to 5 days; cold storage will firm the caramel and chocolate more than room temperature. For freezing, arrange unbaked, shaped cookies on a tray in a single layer and freeze for 30 minutes, then transfer to a freezer-safe bag. Bake from frozen, adding 1 to 2 minutes to the bake time. Fully baked cookies freeze well up to 3 months—thaw at room temperature for 30 minutes before serving.
Ingredient Substitutions
If you need to adapt, here are reliable swaps: replace milk chocolate with semi-sweet or dark chocolate for less sweetness—use the same weight. To make the filling richer and tangier, stir in a pinch of flaky sea salt into the caramel before spooning. For a nutty twist, stir 1 tablespoon of finely chopped toasted pecans into the caramel. If avoiding dairy, vegan caramels and plant-based cream can be used, though texture will vary; note the cookies themselves contain butter and egg, so to make the base dairy-free and egg-free requires a more substantial recipe rework (use vegan butter and a flax egg, and expect a softer texture).
Serving Suggestions
Serve these alongside coffee, hot chocolate, or a strong black tea—the bitterness of the drink balances the sweetness of caramel and chocolate. For parties, arrange on a platter with sprigs of fresh mint or citrus zest for color. They pair beautifully with vanilla ice cream as a crunchy-sweet garnish or crumbled over creamy puddings. For gift-giving, layer cookies in a box with parchment and include a small note about reheating: 10 seconds in the microwave to soften the caramel if desired.
Cultural Background
Thumbprint-style cookies have roots in various European baking traditions, often filled with jam. This caramel-and-chocolate variant is a modern American twist inspired by the popular candy bar format of a shortbread biscuit, caramel center, and chocolate coating. The transformation from jam to caramel reflects the shift toward richer, indulgent fillings that became popular in home baking once individually wrapped caramels and quality chocolate became widely available.
Seasonal Adaptations
In autumn, fold in 1/2 teaspoon ground cinnamon and 1/8 teaspoon nutmeg into the dough and use salted caramels for a warm spice note. For winter holidays, add orange zest to the dough and use dark chocolate sprinkled with sea salt. In spring and summer, make smaller bite-sized versions and top with crushed freeze-dried strawberries for a bright contrast.
Meal Prep Tips
For efficient prep, make the dough the day before and refrigerate wrapped in plastic; shape and freeze the balls right before baking. Keep the caramel in a small airtight jar in the refrigerator for up to a week—reheat gently over low heat before filling. Store the melted chocolate in a warm thermos during assembly to keep it fluid for drizzling if assembling many cookies at once.
These Twix Thumbprint Cookies are a crowd-pleasing blend of buttery base, molten caramel, and glossy milk chocolate. Whether you’re baking for a holiday exchange or a quiet afternoon treat, they’re easy to scale and personalize. I hope you enjoy making them as much as my family does.
Pro Tips
Use room-temperature eggs and butter so they incorporate quickly and evenly into the dough.
Spoon and level both flour and sugar for accurate measurement and consistent texture.
Chill shaped dough for at least 30 minutes to ensure the cookies hold their thumbprint wells during baking.
If centers puff in the oven, press while warm to reform the indentation before adding caramel.
This nourishing twix thumbprint cookies recipe is sure to be a staple in your kitchen. Enjoy every moist, high protein slice — it is perfect for breakfast or as a wholesome snack any time.
FAQs about Recipes
Can I freeze the dough?
Yes. Shape and freeze unbaked dough balls on a tray until firm, then transfer to a freezer-safe container. Bake from frozen and add 1 to 2 minutes to the bake time.
What if the caramel sets too quickly?
Reheat the caramel slightly on low heat or in the microwave for a few seconds if it firms before filling.
Tags
Twix Thumbprint Cookies
This Twix Thumbprint Cookies recipe makes perfectly juicy, tender, and flavorful steak every time! Serve with potatoes and a side salad for an unforgettable dinner in under 30 minutes.
Instructions
Cream butter and sugar
In a large bowl, beat 1 cup softened unsalted butter and 3/4 cup granulated sugar until light and combined, about 2 minutes. Scrape down the sides as needed.
Add eggs and vanilla
Add 1 whole large egg and beat until incorporated. Add 1 egg yolk and 1/2 teaspoon vanilla, mixing until just blended.
Mix in dry ingredients
Whisk 2 2/3 cups all-purpose flour and 1/4 teaspoon kosher salt, then add gradually to the wet mixture on low until a cohesive dough forms.
Shape and create wells
Spoon one leveled tablespoon of dough per cookie, roll into balls, place on parchment, and press the center with the back of a tablespoon to form a well. Freeze shaped dough for 30 minutes.
Bake
Preheat oven to 350°F (180°C). Bake cookies on a parchment-lined sheet for 15 to 16 minutes until edges are lightly golden. Press centers if they rise during baking.
Cool
Transfer to a wire rack and cool completely before filling to prevent caramel from sinking into the cookie.
Make caramel filling
In a small saucepan over low heat, combine 24 unwrapped caramels and 1/2 cup heavy cream. Stir constantly until smooth, then spoon about 1 teaspoon into each cookie well.
Melt chocolate and finish
Melt 4 ounces milk chocolate over low heat until smooth. Transfer to a piping bag or plastic bag, snip a corner, and drizzle over each caramel-filled cookie. Let set before serving.
Last Step: Please leave a rating and comment letting us know how you liked this recipe! This helps our business to thrive and continue providing free, high-quality recipes for you.
Nutrition
Did You Make This?
Leave a comment & rating below or tag
@feastu on social media!
Categories:
You might also like...

Spooky Mummy Cake Balls
Delightfully spooky and sweet, these bite-sized mummy cake balls combine moist cake, creamy centers, and a vanilla candy shell for effortless Halloween fun.

Galaxy Donuts with Swirled Glaze
Fluffy homemade donuts crowned with a shimmering galaxy glaze. Fry or bake, swirl bold colors, and watch these showstoppers disappear fast.

Buttery Pecan Pie Bars
Buttery shortbread crust meets gooey pecan pie filling in easy bar form, perfect for holidays, bake sales, and cozy weeknights.
Did You Make This?
Leave a comment & rating below or tag @feastu on social media!
Rate This Recipe
Share This Recipe
Enjoyed this recipe? Share it with friends and family, and don't forget to leave a review!
Comments (1)
This recipe looks amazing! Can't wait to try it.
Comments are stored locally in your browser. Server comments are displayed alongside your local comments.

Hi, I'm Emma!
What's Popular

30-Minute Meals!
Join to receive our email series which contains a round-up of some of our quick and easy family favorite recipes.