
Candy Cane Peppermint Cupcakes

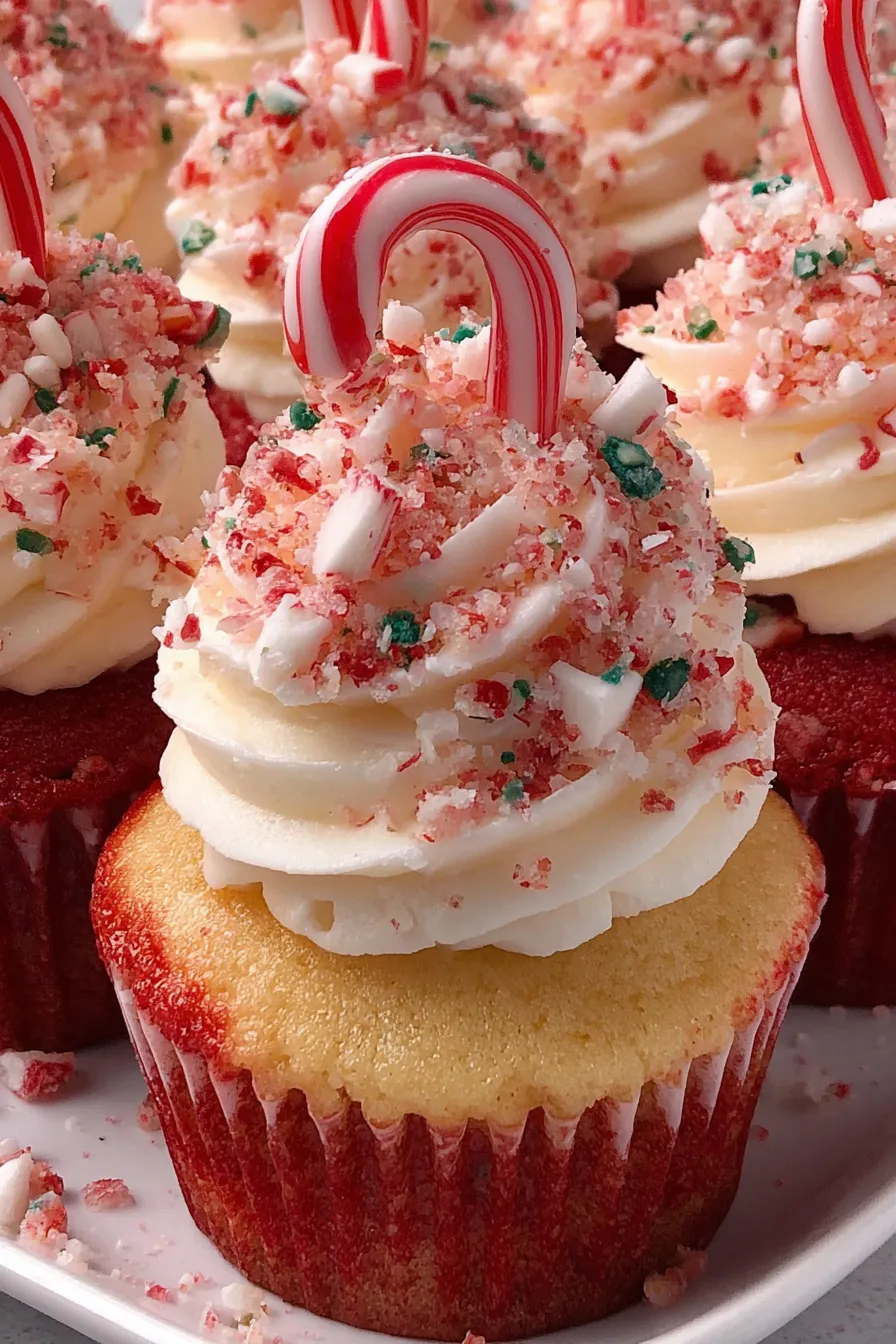
Light, festive cupcakes swirled with red and white batter, topped with a fluffy peppermint buttercream and finished with mini candy canes or coarse peppermint sugar.
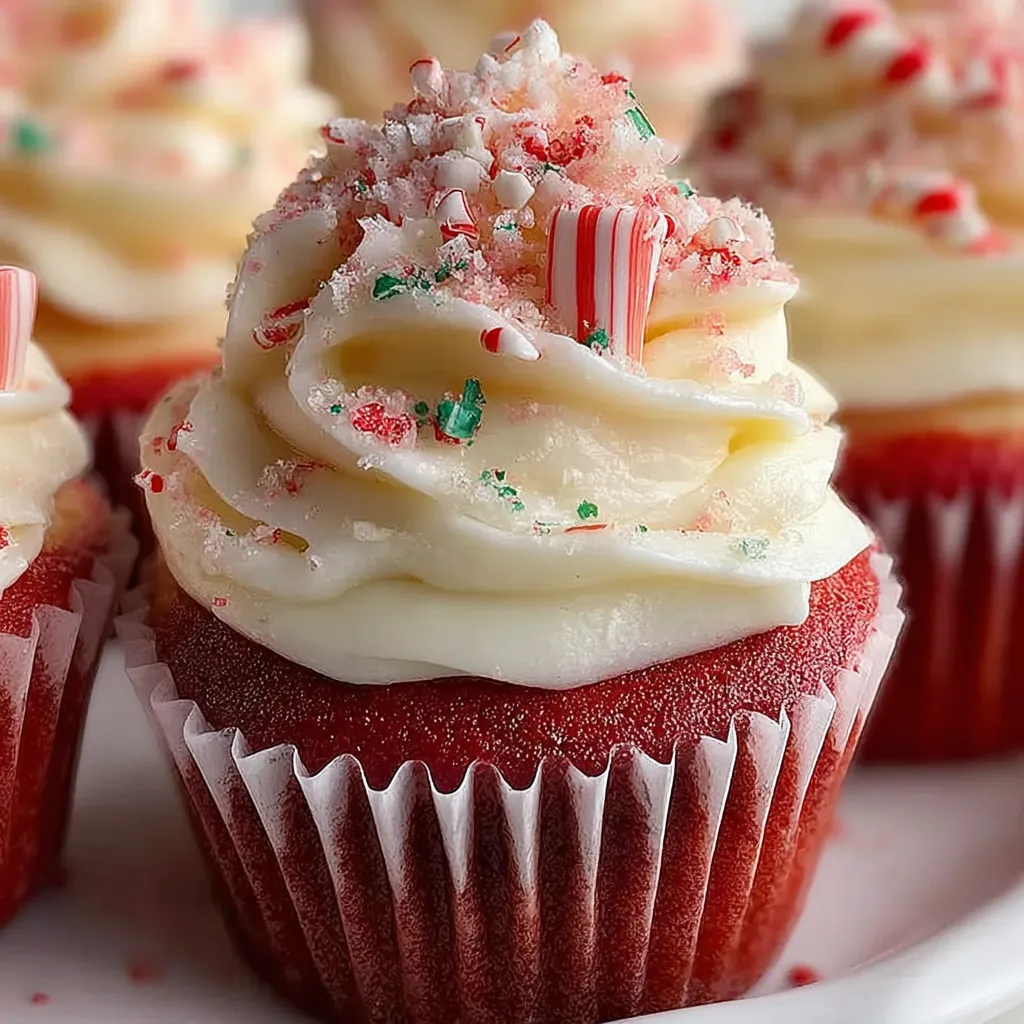
These Candy Cane Peppermint Cupcakes became my holiday signature the year I decided to skip the store-bought treats and make something that tasted like a winter morning: bright, cool peppermint layered over a tender vanilla crumb with festive red swirls. I first tested this combination during a December baking marathon; the house smelled like sugar and spruce, and my kids declared them "official holiday cupcakes" after the first bite. They're special because they strike a balance between playful presentation and dependable, simple technique — the red-and-white ribboned interior feels celebratory, while the peppermint buttercream is light, not cloying.
The texture is what keeps people coming back: the cupcake crumb is soft and springy from a good quality white mix, and the buttercream is airy because the butter is whipped well and lightened with heavy cream. The peppermint extract cuts through the richness and gives that unmistakable candy-cane finish. I love serving these at parties because they hold up well through a few hours on the dessert table and look beautiful when grouped together with mini candy canes as toppers.
Why You'll Love This Recipe
- Ready with pantry staples and one boxed mix: perfect when you want a festive dessert without an all-day commitment.
- Makes about 18 cupcakes in two standard muffin tins — ideal for parties, cookie exchanges, or school events.
- Visual wow with a simple technique: split and tint batter, then alternate to create a red-and-white swirl with no fancy tools required.
- Fast buttercream that pipes beautifully: the frosting is stabilized with confectioners’ sugar but lightened with heavy cream for a fluffy finish.
- Make-ahead friendly: the cupcakes and frosting freeze well, and you can decorate them the day of the event for fresh appearance.
I personally appreciate how forgiving this method is — I once made a double batch for a school fair and still had time to add handmade toppers. Family and friends always notice the peppermint balance; it’s bright enough to be unmistakable but not overpowering.
Ingredients
- White cake mix: One standard box (about 15.25 ounces). Use a reliable brand like Pillsbury or Duncan Hines for consistent results; follow the package for eggs, oil, and water called for on the box. The mix gives a sturdy, pale crumb that showcases the red swirls.
- Red gel food coloring: Gel coloring (as needed) provides an intense hue without thinning the batter. Brands like AmeriColor or Wilton have concentrated gels — start with a small amount and add to reach the shade you want.
- Unsalted butter: 3 sticks (1 1/2 cups) softened to room temperature for smooth, whipped frosting. Using unsalted butter lets you control seasoning; if using salted, reduce additional salt slightly.
- Kosher salt: 1/2 teaspoon. Enhances the sweetness and deepens flavor when added to the frosting; use Diamond Crystal or a comparable variety and measure by feel if your brand differs in flake size.
- Confectioners’ sugar: About 2 7/8 cups, sifted to avoid lumps. Sifting prevents streaky frosting and gives a silkier texture when whipped with butter and cream.
- Heavy cream: 2 tablespoons to loosen and lighten the frosting. Adds sheen and helps the buttercream hold better for piping while remaining tender on the palate.
- Pure vanilla extract: 1 teaspoon for depth and warmth in the frosting. Use a good-quality vanilla — it makes an audible difference in the finished flavor.
- Peppermint extract: 1/2 teaspoon. Pure peppermint extract is potent, so a little goes a long way; adjust by small increments to suit your taste.
- Decoration: Mini candy canes or coarse red-and-white peppermint sugar to finish the tops. Candy cane pieces add crunch while the coarse sugar gives sparkle and a rustic look.
Instructions
Preheat and prepare pans: Place oven racks in the upper and lower thirds and preheat to 350°F (175°C). Line 18 cupcake cups across two standard 12-cup muffin tins with paper liners to ensure even baking and easy removal. Make the batter: Prepare the cake mix according to the package instructions (add the eggs, oil, and water specified on the box). Once mixed, divide the batter evenly into two bowls — this ensures consistent texture and bake time for both colors. Tint half the batter: Add red gel food coloring a little at a time to one bowl and stir until you reach the desired shade. Gel coloring is concentrated, so start with a pea-sized amount and increase until you get a festive red that won’t bleed too much when baked. Fill the liners: Alternate spoonfuls of white and red batter into each paper liner until cups are about half full, roughly 3 to 4 tablespoons per cup (45 to 60 mL). The alternating spooning creates the marbled interior once baked; don’t overfill to avoid spilling over. Bake and cool: Bake for 18 to 20 minutes, rotating the tins halfway through for even color and rise. Insert a toothpick into the center — it should come out clean or with a few crumbs. Transfer cupcakes to a cooling rack and let cool completely before frosting. Prepare the buttercream: Beat 3 sticks (1 1/2 cups) softened unsalted butter and 1/2 teaspoon kosher salt on medium speed for about 2 minutes until creamy. Gradually add sifted confectioners’ sugar in two batches, mixing well after each addition to avoid a gritty texture. Add 2 tablespoons heavy cream, 1 teaspoon vanilla extract, and 1/2 teaspoon peppermint extract. Beat on medium-high speed for 2 minutes until light and fluffy. Taste and adjust peppermint in very small increments if you want a stronger hit. Prepare the piping bag: Using a small brush or a long skewer, paint two thin lines of red gel food coloring down the inside of a disposable piping bag fitted with a 1/2-inch round tip (1.27 cm). The lines create a stripe effect on the piped frosting for a candy-cane look. Pipe and decorate: Fill the prepared piping bag with frosting and pipe a swirl over each cooled cupcake. Garnish by pressing a mini candy cane into the center of each cupcake or sprinkling coarse peppermint sugar over the top for sparkle and crunch.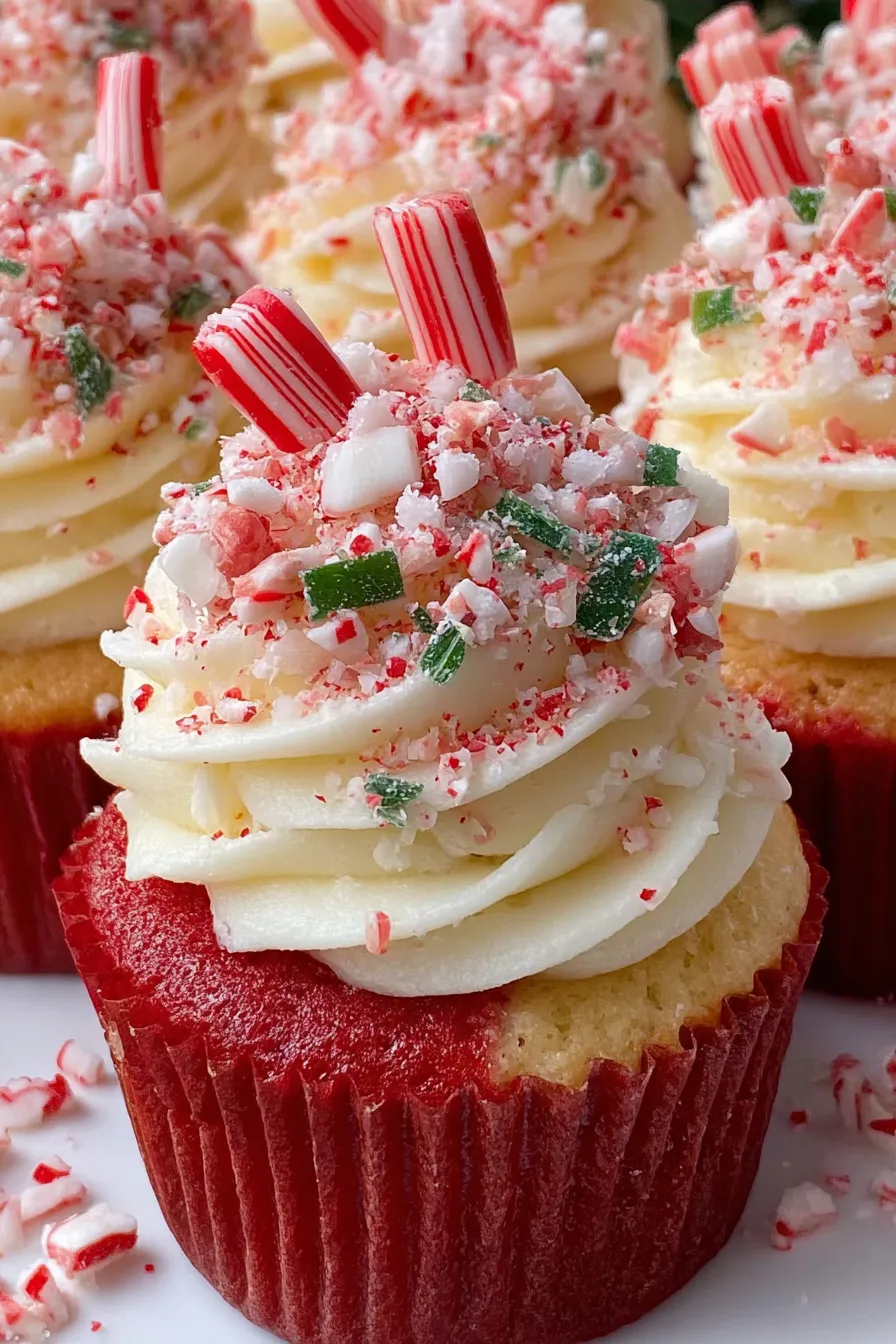
You Must Know
- These keep well covered at room temperature for 24 hours; refrigerate for up to 3 days or freeze un-frosted cupcakes for up to 3 months.
- One boxed mix plus the listed frosting yields approximately 18 generously frosted cupcakes.
- Because peppermint extract is very concentrated, add it slowly to avoid an overpowering taste — start with 1/2 teaspoon and add more by 1/8 teaspoon increments if needed.
- If using salted butter, omit or reduce the added kosher salt in the frosting to avoid oversalting.
My favorite part of this recipe is how the painted piping bag trick makes each cupcake look professionally decorated with almost no extra effort. At a holiday party last year, neighbors asked if I’d taken a class; the reality was simply a little paint and a steady hand. The peppermint-candy finish always brings smiles, and small changes in extract or topper let you tailor sweetness and intensity for different crowds.
Storage Tips
Store frosted cupcakes in a single layer in an airtight container at room temperature for up to 24 hours to preserve frosting texture and crumb tenderness. For longer storage, refrigerate for up to 3 days; bring to room temperature 30 minutes before serving so the buttercream softens and the cake regains full flavor. To freeze, remove frosting and wrap cupcakes individually in plastic wrap, then place in a freezer bag for up to 3 months. Thaw overnight in the refrigerator and allow to come to room temperature before frosting.
Ingredient Substitutions
If you need a dairy-free option, use a vegan butter substitute that whips well and replace heavy cream with full-fat coconut milk, noting that coconut will add a slight flavor. For a gluten-free version, choose a certified gluten-free white cake mix and confirm all decorations are gluten-free. If you prefer a milder mint, use 1/4 teaspoon peppermint extract and supplement with 1/2 teaspoon pure vanilla. To reduce sugar in the frosting, replace 1/2 cup of confectioners’ sugar with a confectioners’ sugar substitute designed for baking, but expect slightly different texture and stability.
Serving Suggestions
Serve these cupcakes at holiday gatherings with hot cocoa, mulled cider, or a chocolate ganache dip for guests who want extra indulgence. Garnish with a small sprig of fresh rosemary for a pine-like aroma, or present them on a tiered stand sprinkled with crushed candy cane for visual impact. They pair nicely with light desserts like lemon bars to contrast the mint, or alongside a cheese board for a whimsical twist.
Cultural Background
While ribboned cakes and peppermint-flavored confections are broadly popular in North American holiday cuisine, the candy cane itself is associated with festive winter traditions dating back to 17th-century Europe. This adaptation applies those classic flavors to an approachable handheld dessert, blending modern convenience (boxed mix) with nostalgic seasonal flavors that evoke the smell of mint and sugar in holiday markets.
Seasonal Adaptations
For a winter-to-spring transition, swap peppermint for 1/2 teaspoon of orange extract and garnish with candied orange peel for a citrusy twist. For an adult party, add 1 tablespoon of peppermint schnapps to the frosting (reduce heavy cream slightly) for a boozy note. In late winter, you can tint the batter pale pink and white for Valentine-themed variations while keeping the peppermint flavor light.
Meal Prep Tips
For efficient prep, bake cupcakes the day before and store unfrosted in an airtight container; whip the buttercream and pipe the morning of the event for freshest presentation. If you’re decorating many at once, use a piping bag with a coupler to quickly swap tips and create variety. Keep a small squeeze bottle of water nearby to smooth accidental frosting edges and a tray lined with parchment to catch excess sprinkles for easy cleanup.
These Candy Cane Peppermint Cupcakes are a small ritual of joy — simple techniques delivering a memorable look and flavor. Try them with different toppers and extracts to make the recipe your own, and enjoy the way a little peppermint can brighten a winter gathering.
Pro Tips
Use gel food coloring to avoid thinning the batter; add a little at a time until you reach the desired shade.
Temper the butter to room temperature for smooth, airy frosting — too cold and it will be lumpy, too warm and it will be greasy.
Paint lines inside the piping bag for a candy-cane stripe effect on piped frosting.
This nourishing candy cane peppermint cupcakes recipe is sure to be a staple in your kitchen. Enjoy every moist, high protein slice — it is perfect for breakfast or as a wholesome snack any time.
FAQs about Recipes
Can I freeze these cupcakes?
Yes. If you want to freeze finished cupcakes, freeze unfrosted cupcakes wrapped tightly and thaw before frosting for best texture.
How much peppermint extract should I use?
Use small increments of peppermint extract and taste the frosting; peppermint is intense and too much will taste medicinal.
Tags
Candy Cane Peppermint Cupcakes
This Candy Cane Peppermint Cupcakes recipe makes perfectly juicy, tender, and flavorful steak every time! Serve with potatoes and a side salad for an unforgettable dinner in under 30 minutes.
Ingredients
Cupcake batter
Frosting
Decoration
Instructions
Preheat and prepare pans
Position oven racks in the upper and lower thirds and preheat to 350°F (175°C). Line 18 cups across two standard 12-cup muffin tins with paper liners.
Mix batter
Prepare cake mix according to box directions, then divide batter evenly into two bowls to tint half red and keep half white.
Tint batter
Add red gel food coloring a small amount at a time to one bowl until you reach the desired red; gel coloring is concentrated, so a little goes a long way.
Fill liners
Alternate spoonfuls of white and red batter into each liner until about half full (approximately 3–4 tablespoons or 45–60 mL per cup).
Bake and cool
Bake for 18 to 20 minutes, rotating tins halfway. A toothpick inserted should come out clean. Cool completely on a wire rack before frosting.
Make buttercream
Beat softened butter and salt until creamy, add confectioners’ sugar in two additions, then beat in heavy cream, vanilla, and peppermint. Whip on medium-high for 2 minutes until light.
Decorate
Paint two lines of red gel inside a piping bag fitted with a 1/2-inch round tip, fill with frosting, pipe swirls, and top with mini candy canes or coarse peppermint sugar.
Last Step: Please leave a rating and comment letting us know how you liked this recipe! This helps our business to thrive and continue providing free, high-quality recipes for you.
Nutrition
Did You Make This?
Leave a comment & rating below or tag
@feastu on social media!
Categories:
You might also like...

Spooky Mummy Cake Balls
Delightfully spooky and sweet, these bite-sized mummy cake balls combine moist cake, creamy centers, and a vanilla candy shell for effortless Halloween fun.

Galaxy Donuts with Swirled Glaze
Fluffy homemade donuts crowned with a shimmering galaxy glaze. Fry or bake, swirl bold colors, and watch these showstoppers disappear fast.

Buttery Pecan Pie Bars
Buttery shortbread crust meets gooey pecan pie filling in easy bar form, perfect for holidays, bake sales, and cozy weeknights.
Did You Make This?
Leave a comment & rating below or tag @feastu on social media!
Rate This Recipe
Share This Recipe
Enjoyed this recipe? Share it with friends and family, and don't forget to leave a review!
Comments (1)
This recipe looks amazing! Can't wait to try it.
Comments are stored locally in your browser. Server comments are displayed alongside your local comments.

Hi, I'm Emma!
What's Popular

30-Minute Meals!
Join to receive our email series which contains a round-up of some of our quick and easy family favorite recipes.