
No-Bake Peanut Butter Lasagna

A layered, no-bake dessert with a crunchy cookie base, silky cream cheese, and a lush peanut butter filling topped with whipped cream, chips, and cookie pieces.
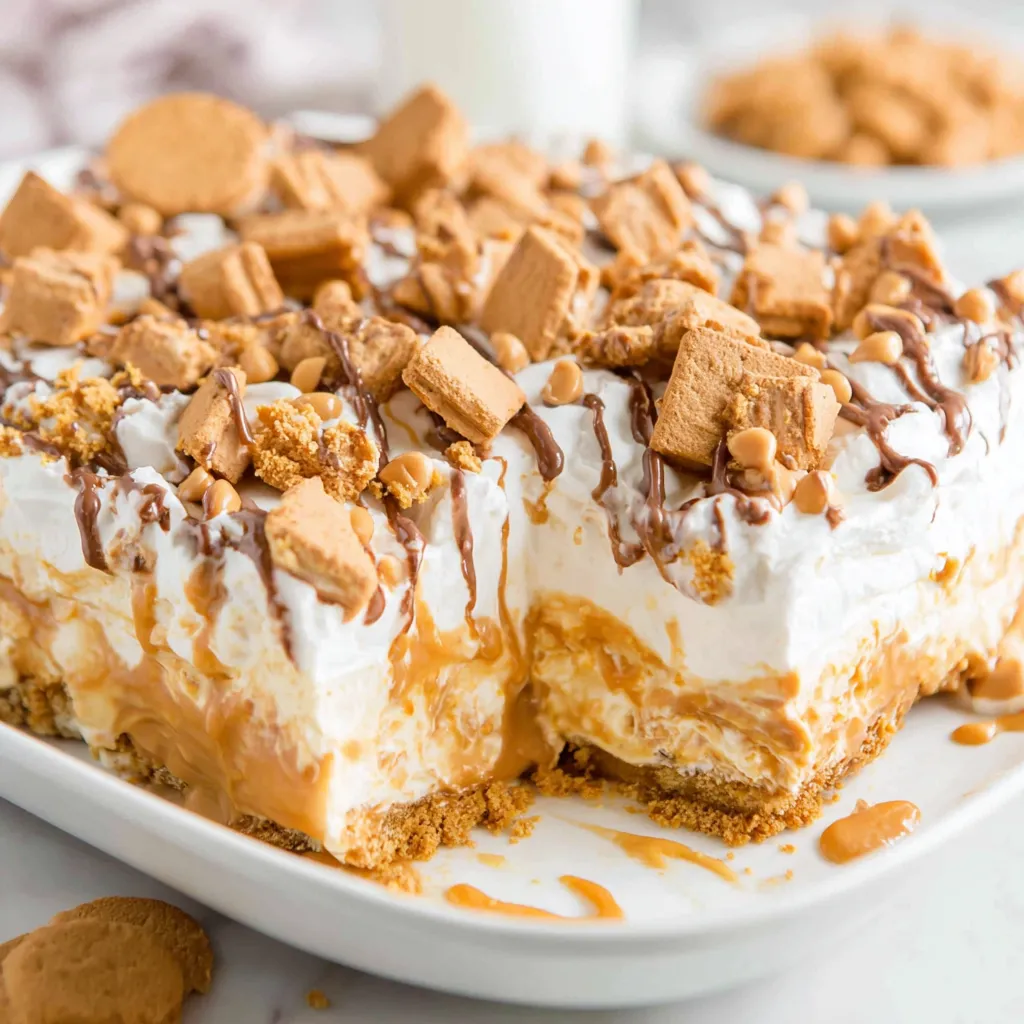
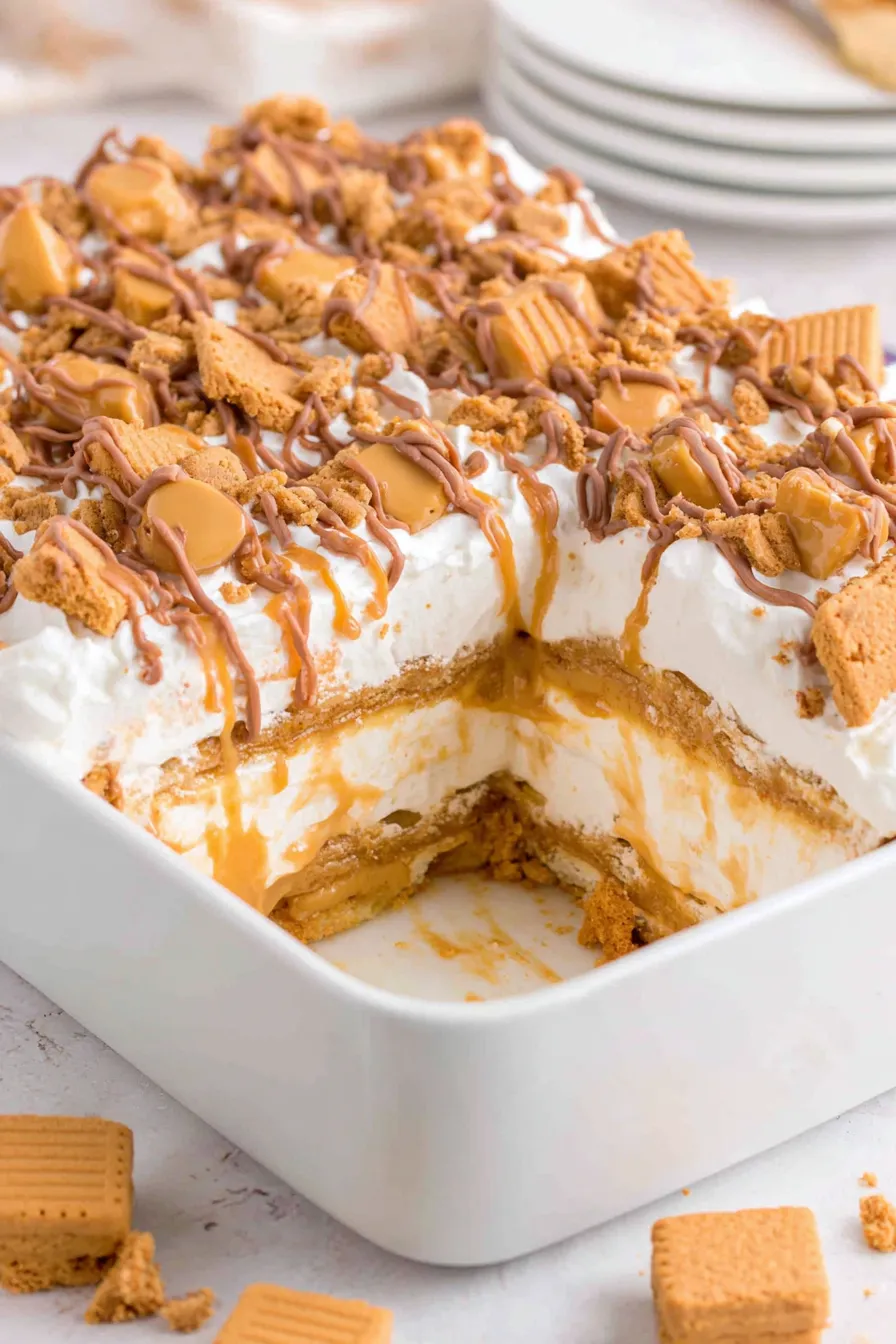
This Peanut Butter Lasagna has been a party essential in my kitchen for years. I first made it for a summer backyard get-together when I needed something that could be prepped in advance, transported without worry, and satisfy a crowd with minimal fuss. The first spoonful was a revelation: crisp peanut butter sandwich cookie gives way to a tangy, silky cream cheese layer, then a cloudlike peanut butter pudding layer, and finally a pillowy whipped topping studded with chips and cookie pieces. It hits the sweet-salty balance perfectly and always disappears first.
I discovered this composition during a busy holiday season when oven time was at a premium. Since then it has made appearances at birthday parties, potlucks, and weekday desserts. The textures are what make it memorable: crunchy cookie crust, smooth cream cheese, dense yet airy peanut butter mousse, and a crunchy garnish. The make-ahead nature means you can prepare components in stages and assemble when you are ready to serve, which has saved me many last-minute panics.
Why You'll Love This Recipe
- This is entirely no-bake so it is quick to assemble and requires no oven time, perfect for hot days or busy schedules.
- The layered structure delivers multiple textures in each bite: crunchy cookie base, creamy cheese layer, dense peanut butter pudding, and a light whipped cream topping.
- Most ingredients are pantry staples or easy to find: peanut butter sandwich cookies, instant pudding, cream cheese, and whipped topping — no specialty shopping required.
- It stores and travels well; make it a day ahead and finish with the garnish the morning of the event to keep it looking fresh.
- Adaptable for portion sizes and gatherings: assemble in a 9x13 pan for a crowd or halve the recipe for a smaller family dessert.
- Kid-friendly and crowd-pleasing; picky eaters usually ask for seconds and the recipe is ideal for casual buffets and potlucks.
I remember the time my niece declared it the best dessert she had ever tasted and licked the dish clean. Family members frequently request this when they come over and I often make two pans during the holidays. It’s the sort of recipe that sparks conversation because people ask how you built each layer and then go back for more.
Ingredients
- Crust: 16 ounces peanut butter sandwich cookies. Look for a sturdy sandwich cookie rather than a flaky wafer; the classic brand-style cookies hold their crunch against the creamy layers. You will lay a whole single layer in the pan — about 22 cookies for a standard 9x13 dish.
- Cream cheese layer: 8 ounces cream cheese, softened. Use full-fat cream cheese for the best texture and flavor. Softening to room temperature ensures it whips smooth with powdered sugar and keeps the layer light.
- Sweetener: 1 cup powdered sugar. Powdered sugar blends seamlessly into the cream cheese without graininess; sift if it appears clumpy.
- Whipped topping: 4 cups total (1 cup + 1 cup + 2 cups). Use thawed frozen whipped topping or stabilized whipped cream. This supplies the light lift for the cream cheese and pudding layers and the final finish.
- Peanut butter layer: 3.4 ounces instant vanilla pudding mix, 1 1/2 cups whole milk, 1 cup creamy peanut butter. Instant pudding sets quickly with cold milk; choose a high-quality creamy peanut butter for a smooth, cohesive filling.
- Topping: 1/2 cup peanut butter chips, 8 reserved whole peanut butter cookies (chopped), 1/2 cup creamy peanut butter, melted. The chips add salty crunch, cookie pieces echo the base, and the melted peanut butter provides ribboned richness across the top.
Instructions
Prepare the dish: Grease a 9x13 glass baking dish lightly with nonstick spray or a thin layer of butter to prevent sticking. Lining the pan with parchment is optional but makes serving cleaner. Lay a single layer of peanut butter sandwich cookies to completely cover the bottom — about 22 cookies depending on brand and alignment. Make the cream cheese layer: In a mixing bowl, beat 8 ounces of softened cream cheese until smooth. Add 1 cup powdered sugar and 1 cup whipped topping, then beat on medium-low until fully combined and glossy. Taste and adjust sweetness if needed. Spread this mixture evenly over the cookie base using an offset spatula to avoid displacing the cookies. Freeze the pan for 15 minutes to firm the layer for easier topping. Prepare the peanut butter filling: Whisk 3.4 ounces instant vanilla pudding mix with 1 1/2 cups cold whole milk until it begins to thicken — about 1 to 2 minutes by hand. Stir in 1 cup creamy peanut butter until smooth, then gently fold in 1 cup whipped topping to lighten. Use a balloon whisk or hand beater to keep the texture airy. Spread this layer evenly over the chilled cream cheese layer and return to the freezer for another 15 minutes to set the layers together. Finish the top: Remove the pan from the freezer and spread the remaining 2 cups whipped topping over the peanut butter layer in an even sheet. Sprinkle 1/2 cup peanut butter chips and the chopped reserved cookies across the surface. Drizzle 1/2 cup melted creamy peanut butter in thin ribbons for visual appeal and extra peanut flavor. Chill the assembled dish in the refrigerator for 30 minutes or in the freezer for 15 minutes to firm up before slicing and serving.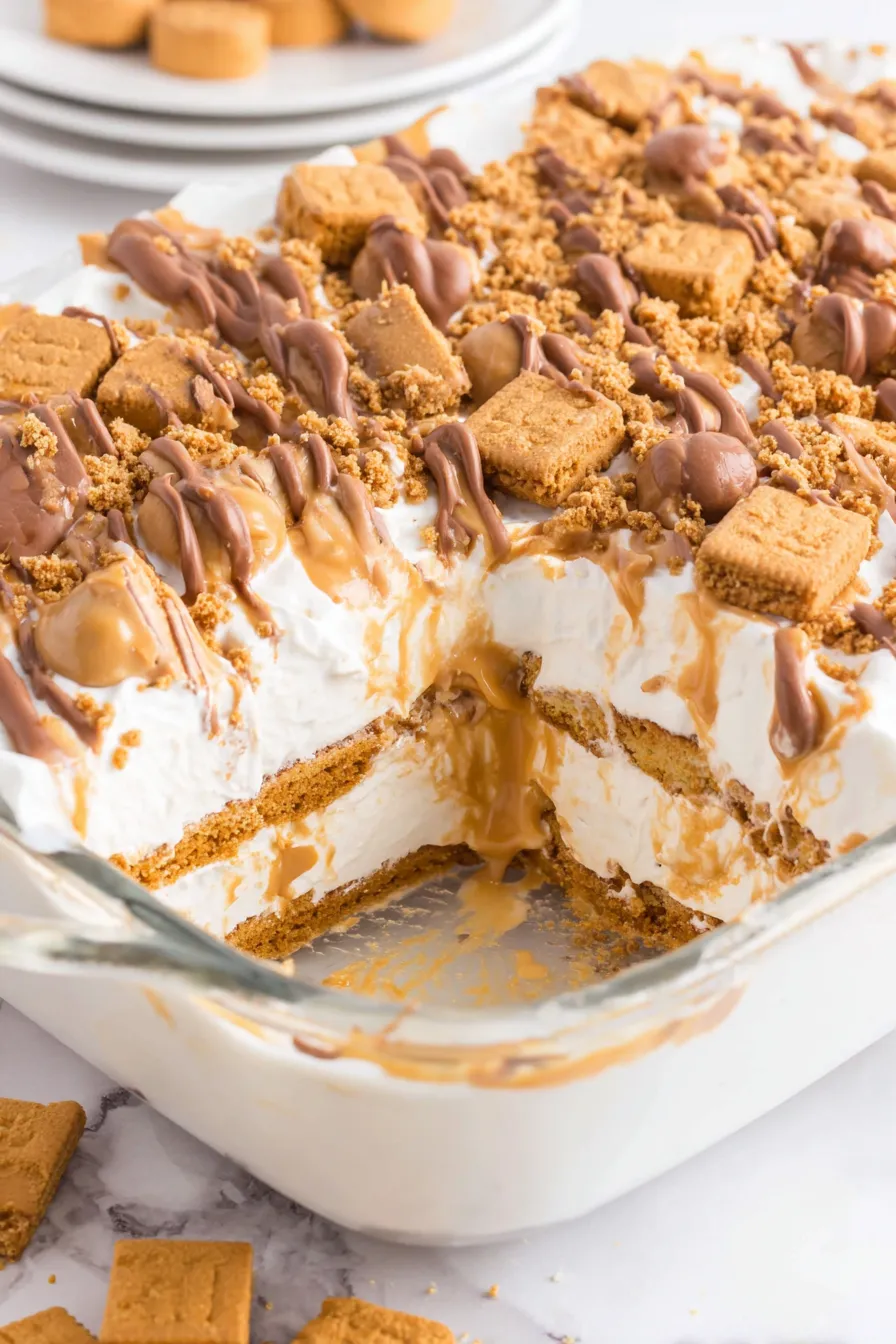
You Must Know
- This keeps well: refrigerated for up to 3 days if covered tightly; the cookie base will soften slightly but stay pleasant.
- Freezing: freeze covered for up to 1 month. Thaw overnight in the refrigerator before serving for best texture.
- High in protein and fat from peanut butter and cream cheese — treat as an indulgent dessert and serve in small squares.
- Make-ahead friendly: assemble the day before and top with chips and cookie pieces just before serving to preserve crunch.
My favorite part is how adaptable the layers are: you can change the pudding flavor for a chocolate or banana twist, or swap out the cookies for a different sandwich variety. Family gatherings often revolve around who can get the biggest piece and everyone debates whether the cookie base or the peanut butter layer is the best part. It’s a reliably joyful dish to bring to any celebration.
Storage Tips
Store the pan covered with plastic wrap or an airtight lid in the refrigerator for up to three days. If you need to hold it longer, wrap the dish tightly with plastic and then aluminum foil and freeze for up to one month. To serve from frozen, transfer to the refrigerator and let thaw overnight. For quicker serving, let individual slices sit at room temperature for 10 to 15 minutes after refrigeration to take the chill off and let flavors bloom. Avoid leaving the assembled dish at room temperature for more than two hours because of the dairy content.
Ingredient Substitutions
To alter flavor or accommodate pantry limits, substitute chocolate instant pudding for vanilla to create a chocolate-peanut version. Use reduced-fat cream cheese or light whipped topping to lower calories, noting the texture will be slightly less rich. For a gluten-free option, use gluten-free peanut butter sandwich cookies or substitute a graham cracker crust with gluten-free crackers. If you want a more pronounced peanut punch, fold an extra 1/4 cup peanut butter into the pudding layer but expect a denser texture.
Serving Suggestions
Cut into 12 generous squares and serve on dessert plates with a small drizzle of warm caramel or additional melted peanut butter. Pair with cold milk or coffee for a classic combo, or serve alongside fresh berries to add acidity and balance the richness. For parties, place the pan on a decorative platter and add a scattering of peanut butter chips and a few whole cookies as garnish so guests know what they are about to enjoy.
Cultural Background
Layered, no-bake desserts have strong roots in American potluck culture where convenience, portability, and crowd-pleasing flavors matter most. This composition borrows elements from classic layered desserts and pie-like constructions that rely on cookie bases, whipped fillings, and pudding layers. The use of peanut butter sandwiches adds a nostalgic element tied to mid-20th-century snack development and home baking innovations that prioritized accessibility and shelf-stable pantries.
Seasonal Adaptations
In summer, keep the pan chilled until serving and top with fresh sliced strawberries for a light contrast. In winter, add a pinch of cinnamon to the cream cheese layer and swap the drizzle for warm salted caramel. For spring gatherings, fold in a handful of toasted chopped peanuts for extra crunch and a toasted aroma. Holidays are ideal for swapping vanilla pudding with chocolate to create a richer holiday offering.
Success Stories
At a recent family reunion this dish was declared the runaway favorite; relatives who rarely venture into sweets cut second helpings. I once halved the recipe for a small dinner and brought it to a friend recovering from surgery — they appreciated the familiar peanut flavor and ease of portioning. Comments often mention the balanced sweetness and the way the cookie base holds up against the cream layers.
Meal Prep Tips
Assemble up to two days ahead, keeping the final drizzle and crunchy toppings separate until just before serving to maintain contrast. Use a shallow 9x13 pan for even layering and faster chilling. Portion in individual containers for grab-and-go dessert lunches or freeze slices between parchment sheets for easy single-serve thawing. Label with the date and contents so you can rotate through frozen treats efficiently.
This Peanut Butter Lasagna is more than just a dessert; it’s a dependable treat that brings people together. The ease of assembly, adaptable flavors, and crowd-pleasing texture make it a favorite I return to again and again. Try it once and you’ll understand why it’s become a staple in my entertaining playbook.
Pro Tips
Chill each layer briefly before adding the next to keep clean, distinguishable layers.
Use room temperature cream cheese to avoid lumps and ensure a smooth cream cheese layer.
Reserve toppings and add them just before serving to preserve crunch and visual appeal.
If melted peanut butter is too thick to drizzle, warm it briefly in the microwave for 10 to 15 seconds and stir.
This nourishing no-bake peanut butter lasagna recipe is sure to be a staple in your kitchen. Enjoy every moist, high protein slice — it is perfect for breakfast or as a wholesome snack any time.
FAQs about Recipes
How long will this keep in the fridge?
Yes. Keep covered in the refrigerator for up to 3 days. For longer storage, freeze well wrapped for up to 1 month and thaw in the refrigerator.
Can I make a chocolate variation?
Yes. Substitute chocolate instant pudding and add 1/4 cup cocoa to intensify the chocolate flavor and create a chocolate-peanut version.
Tags
No-Bake Peanut Butter Lasagna
This No-Bake Peanut Butter Lasagna recipe makes perfectly juicy, tender, and flavorful steak every time! Serve with potatoes and a side salad for an unforgettable dinner in under 30 minutes.
Ingredients
Crust
Cream Cheese Layer
Peanut Butter Layer
Topping
Instructions
Prepare and line the pan
Grease a 9x13 glass baking dish lightly and arrange a single layer of peanut butter sandwich cookies to cover the bottom of the pan.
Make the cream cheese mixture
Beat softened cream cheese until smooth, add powdered sugar and 1 cup whipped topping, then spread evenly over the cookie base and freeze 15 minutes.
Prepare peanut butter pudding layer
Whisk instant vanilla pudding with whole milk until slightly thickened, stir in creamy peanut butter and fold in 1 cup whipped topping; spread over cream cheese and freeze 15 minutes.
Top and finish
Spread remaining 2 cups whipped topping, sprinkle peanut butter chips and chopped cookies, drizzle melted peanut butter, then chill in refrigerator 30 minutes or freezer 15 minutes before serving.
Last Step: Please leave a rating and comment letting us know how you liked this recipe! This helps our business to thrive and continue providing free, high-quality recipes for you.
Nutrition
Did You Make This?
Leave a comment & rating below or tag
@feastu on social media!
Categories:
You might also like...

Spooky Mummy Cake Balls
Delightfully spooky and sweet, these bite-sized mummy cake balls combine moist cake, creamy centers, and a vanilla candy shell for effortless Halloween fun.

Galaxy Donuts with Swirled Glaze
Fluffy homemade donuts crowned with a shimmering galaxy glaze. Fry or bake, swirl bold colors, and watch these showstoppers disappear fast.

Buttery Pecan Pie Bars
Buttery shortbread crust meets gooey pecan pie filling in easy bar form, perfect for holidays, bake sales, and cozy weeknights.
Did You Make This?
Leave a comment & rating below or tag @feastu on social media!
Rate This Recipe
Share This Recipe
Enjoyed this recipe? Share it with friends and family, and don't forget to leave a review!
Comments (1)
This recipe looks amazing! Can't wait to try it.
Comments are stored locally in your browser. Server comments are displayed alongside your local comments.

Hi, I'm Emma!
What's Popular

30-Minute Meals!
Join to receive our email series which contains a round-up of some of our quick and easy family favorite recipes.